Making a Torsion Box Table
This is the process I used to make a 40" by 92" torsion box table. The initial intent was to build a flat table to assemble and glue up the 42 window frames for the Galleria.
Back to Luigi's woodworking home page
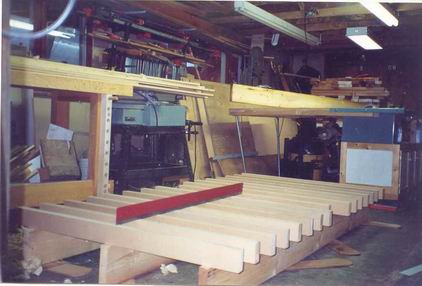
This first picture shows the first step. I carefully jointed 3 cedar 2X8s using my ca. 1919 Stanley #7C. I also made a bunch of cauls out of MDF - 2 pieces of 3/4" stuff glued together and then run through the planer to ensure they all were the same width. Since the table was intended to be an assembly & glue-up table, I felt I needed the cauls.
The jointed 2X8s were carefully laid on the floor and shimmed up with cedar shingles. I used two of the cauls as winding sticks to ensure the 2X8 were not out of wind.
I then laid the other cauls and used my super accurate 4' straight edge to make sure there were no high or low spots. The straightedge is the red thing you see on the cauls.
|

|
I made that straightedge out of plain old cheap hot-rolled steel 3/16" by 4' by 4" available at your local borg. Actually, I made three of them. First, I used the grinder to flatten the rounded edge. Then with a large file used like a plane, I straightened the steel edge the best I could. Finally, with automotive valve grinding compound, I lapped them successively against each other in different orientations using the method described in
Swensen's web page.
I occasionally tested with feeler gauges to see how the process was going. At the end, the straightedges were within 0.01mm (I was using metric feeler gauges). With any two straightedges separated by a 0.04mm gauge, I could not insert at 0.05mm gauge anywhere. With them resting on 0.05mm, the 0.04mm gauge fit everywhere, while a 0.06mm did not fit.
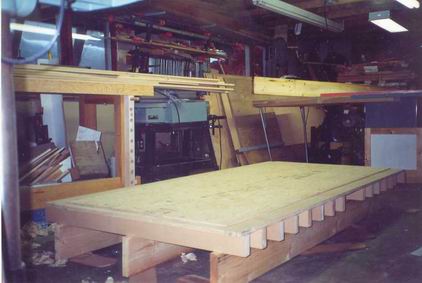
Ok, back to the torsion box table. I lay the plywood on top and discovered the 2X8s were actually 7' long, not 8' as I had originally assumed. Note that I am an economist and, like most of my profession, have a wide experience with unwarranted assumptions.
|
So, off to the lumberyard to get some 8' long SPF 2X8s, the best I could find. I jointed them and repeated the process described above to ensure that the "bed" of cauls was as perfectly flat as I could make it.
Note the stack of 2X4 looking wood (with some ends painted white) behind the Table saw. That is the motivation behind the torsion box table. Those are actually clear cedar that eventually got transformed into 42 window frames. I wanted the table so I would have a really
flat surface to assemble them on.
Also note the stack of wood on the bench. That is what created the grid for the torsion box. More on that later.
|
|
Enough digressions, on to the next pitcher.
|
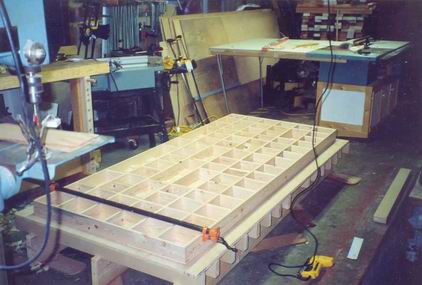
Now you see the bottom plywood for the torsion box. 3/8" good-one-side Doug Fir. Under that is a sheet of masonite to capture the glue so it doesn't fall on the 3/4" maple plywood at the bottom.
Also note on the top left hand side, the window looking into the greenhouse. And note the angled greenhouse studs, and the line of snow. I was doing this work in winter.
On to the torsion box grid.
|
|
|
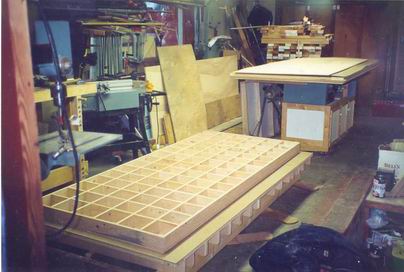
Here you see the torsion box framework assembled. It was made out of 1X4 Hem-fir crating I got with an order of acrylic roofing. Most of it was 16' long, and #1 and #2. I planed it down to 1/2" thick and squared it on the table saw.
Note the electric stapler on the floor. This is what was used to assemble the grid. One staple at each intersection, The pipe clamp was helpful in keeping stuff together before it was stapled. No glue yet.
|
|
|
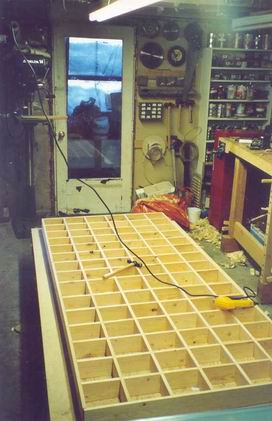
Here is another view of the assembled grid, from the other direction.
The Warrington hammer was used to nail down the staples where needed. Shavings on the floor are from jointing the 2X8 base.
The door is into the greenhouse & you can see the snow on the greenhouse windows behind it. Also note the Italian carpenter's hammer on the wall next to the door. 18" long handle and a 10oz head. You can easily drive (or should I say whip in?) a 3" spike in three blows with it.
|
|
The assembly is now ready for glue-up.
All the plywood sheets on the saw will go on top of the table.
First, I marked the location of the grid on the bottom ply, so that I would know where to put glue. Then I got the LOML to help.
We moved the grid to the table saw on top of all the plywood. With small paint rollers, we applied the glue to the bottom ply. Then moved and positioned the grid on the bottom ply. Applied glue to the top of the grid. Put the top ply on it, then moved all the other ply on top of it. All this had to be done quickly.
Then some pieces of 2X8 & 2X10 for the go-sticks, but that is for the next picture.
|
|
|
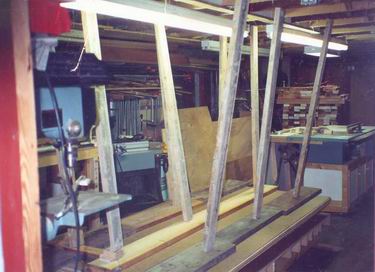
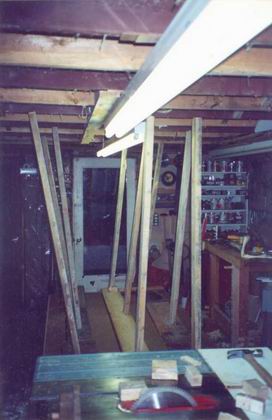
This picture shows the clamping system. 2x8s & 2X10 on top of the stack of plywood, which is no top of the torsion box.
The go-sticks are 2X4s which were previously used for concrete formwork. They are at an angle, and are jammed between the assembly and the ceiling joists. Put them on the 2X's under a joist and hit them at the top until I saw some squeeze-out from the torsion box.
|
|
|
Here is another view of the glue-up assembly.
The framing hammer on the bottom right (on the table saw) was used to bang the go-sticks into place against the joists and create the pressure.
|
The table turned out very flat - I could not detect any variation with my 4' straightedge. I covered it with 3/4" birch along the edges and Arborite (Formica, Keith and Jeff) for the top and bottom. Also chamfered all the corners. It actually turned out pretty nice so that the LOML insists on using it as a "dining" table instead of an assembly table. So I have to cover it with Masonite whenever I use it for WWing.
It's also pretty heavy, well over 100lbs and I can barely carry it. If I ever do it again, I would look for ways to make it lighter, e.g. using 3/8" lumber for the grid and 1/4" ply. I also have to figure out what kind of legs I can make so that it is reversible (i.e. no holes in the top or bottom). Some kind of trestle, I guess
Sorry, no pictures of the finished table yet.
Back to Luigi's woodworking home page
© 2004 Luigi Zanasi, Whitehorse, Yukon.
The background is western hemlock from Romeyn Hough's The American Woods:
exhibited by actual specimens and with copious explanatory text.